Feel++ is an Open-Source C++ library which allows to solve a large range of partial differential equations using Galerkin methods, e.g. finite element method, spectral element method, discontinuous Galerkin methods or reduced basis methods. Feel++ enables parallel computing in a seamless way and allows to solve large scale systems up to tens of thousands of cores.
BigDFT is a free software package, whose main program allows the total energy, charge density, and electronic structure of systems made of electrons and nuclei (molecules and periodic/crystalline solids) to be calculated within density functional theory (DFT), using pseudopotentials, and a wavelet basis.
Chameleon is a dense linear algebra solver relying on sequential task-based algorithms where sub-tasks of the overall algorithms are submitted to a run-time system. Such a system is a layer between the application and the hardware which handles the scheduling and the effective execution of tasks on the processing units. A run-time system such as StarPU is able to manage automatically data transfers between not shared memory area (CPUs-GPUs, distributed nodes).
PDI supports loose coupling of simulation codes with data handling the simulation code is annotated in a library-agnostic way, libraries are used from the specification tree.
Melissa is a file-avoiding, adaptive, fault-tolerant and elastic framework, to run large-scale sensitivity analysis or deep-surrogate training on supercomputers.
FreeFEM is a popular 2D and 3D partial differential equations (PDE) solver. It allows you to easily implement your own physics modules using the provided FreeFEM language. FreeFEM offers a large list of finite elements, like the Lagrange, Taylor-Hood, etc., usable in the continuous and discontinuous Galerkin method framework.
StarPU is a task-based runtime system for heterogeneous platforms coupling a performance modeling scheduler with a distributed shared-memory manager. It provides a framework for task scheduling on heterogeneous, accelerated platforms, together with an API for implementing various classes of scheduling algorithms. This scheduling framework jointly works with a distributed shared-memory manager to optimize task mappings and data transfers, and to overlap communications with computations.
The following guidelines have been defined by the NumPEx Transverse Working Group “Software Production & Integration”.
1. Packaging
Software should be packaged (Spack and/or Guix package formats). They should be published in public (community controlled) package repositories (Guix-science, etc.).
Packages exist
Packages are published in an easily usable repository
Packages installation is tested on supercomputers
Packages are available in community repositories
Either Guix or Spack packages are available
Both Guix and Spack packages are available
2. Minimal Validation Tests
Software should include minimal validation tests triggered through automated mechanism such as Guix. These tests should be automatic functional tests that do not require specific hardware.
Unit tests exist
CI exists
CI runs regularly (each new release)
CI runs regularly (each new commit in main branch)
3. Public Repository
A public repository, must be available for at least the development version of the software, allowing for pull requests to be submitted.
A repository where sources can be downloaded by anyone
A repository where anyone can submit a modification proposition (pull request)
4. Clearly-identified license
Sources published under a clearly-identified free software license (preferably with REUSE).
Basic documentation should be publicly available to facilitate user understanding and usage of the software.
Documentation exists
It is easily discoverable and browsable online
6. Open Public Discussion Channel
An open, public discussion channel must be provided that is easily accessible to all potential users. The chosen platform must not require special permissions or memberships that could limit user participation.
A channel exist
Anyone can join the discussion channel, free of charge
7. Metadata
Each repository should include metadata easing integration and publicity on a software list.
A policy easing predictability of these aspects for future release is provided (Release schedule, support policy for previous releases)
9. Minimal Performance Tests
Software should include a minimal set of performance tests divided in three categories: single node without specific hardware, single node with specific hardware, multi-nodes. These tests should be automated as much as possible.
Tests exist
Scripts to automate launching the tests on a supercomputer and adaptable for another exist
Scripts using a tool easing portability to new HW exist
Info
In the context of NumPEx, the decision was made to shift from strict policies to more flexible
guidelines to accommodate a broader range of software development stages, from research proofs of
concept to mature software.
This approach contrasts with the E4S policies, which were deemed too
restrictive due to their high maturity requirements for integrated software.
By adopting guidelines, NumPEx
aims to provide recommendations and frameworks that support diverse development levels without
imposing mandatory compliance.
This flexibility allows for the integration of innovative and experimental
software alongside well-established solutions, fostering a more inclusive and dynamic development
environment.
Webinars & Trainings
This page lists the Webinars & Trainings for the Scientific Community organised by the Exa-DI Project:
This second NUMPEX tutorial related to software packaging will specifically target beginners with the Spack package manager.
The tutorial will introduce Spack installation, base commands, specifications , environments, … up to the very basic of software packaging.
No prior experience with Spack is required.
The webinar will be organized as a hands-on session so users can directly experiment with Spack. We will provide accounts on Grid'5000 for all attendees. Users can also bring their own applications and try deployment on their preferred supercomputers. We will be available to assist you and answer questions via video and chat.
Note that this tutorial is part of the NUMPEX software integration strategy backed by the Exa-DI WP3 team. Our ambition is to have all NUMPEX-related libraries packaged with Guix and Spack, make Guix/Spack-based deployment part of every developer’s arsenal, and work with computing centers to make Guix/Spack-based user-level software deployment as frictionless as possible.
Parallel IO and in situ analytics : High-performance data handling @ Exascale
Table of content
Abstract
Maison de la Simulation, together with the Exa-DoST and Exa-DI projects of NumPEx organize a free Parallel IO and in situ analytics: High-performance data handling @ Exascale training.
Over 3.5 days, from Tuesday, June the 4th 1PM to Friday, June the 7th, learn about the must-know tools for high-performance input-output on supercomputers and discover the latest tools for in situ data analytics. From ADIOS to PDI, meet the developers of the leading tools in their category as well as IO administrators of the top French national super-computing facility.
Context
The increase in computational power goes hand in hand with an increase in the amount of data to manage. At Exascale, IO can easily become the main performance bottleneck. Understanding parallel file system mechanisms and parallel IO libraries becomes critical to leverage the latest supercomputers.
With the increasing performance gap between compute and storage, even the best use of IO bandwidth might even not be enough. In this case, in situ analytics become a requirement to exploit Exascale at its peak.
Content
This course introduces the concepts, libraries and tools for IO and in situ data handling to make the best of the top available computing power and storage technologies:
Guix and Spack for Application Deployment Across Supercomputers
Table of content
Day: Thursday, 6th of February, 2025
Time:
10h-12h: General presentation
13h-16h: Practice time
Speakers:
Fernando Ayats Llamas
Romain Garbage
Bruno Raffin (for the intro)
Abstract
The standard way to install a library or application on a supercomputer is to rely on modules to load most dependencies, then compile and install the remaining pieces of software manually. In many cases, this is a time-consuming process that needs to be revisited for each supercomputer. As part of NUMPEX software integration efforts, we advocate relying on advanced package managers to compile and deploy codes with their dependencies.
Guix and Spack, the two package managers favored at NUMPEX, are backed by strong communities and have thousands of packages regularly tested on CI farms. They come with feature-rich CLIs enabling package tuning and transformations to produce customized binaries, including modules and containers. They carefully control the dependency graph for portability and reproducibility. However, most HPC users have not yet made package managers a central tool for controlling and deploying their software stack, and supercomputer centers usually do not install them for easy direct user-level access. The goal of this tutorial is to demystify their usage for HPC and show that they can indeed be used as a universal deployment solution.
This tutorial will be split into two parts. The morning (10:00-12:00) will be dedicated to presentations and discussions. We will present how users can leverage Guix and Spack to deploy libraries (potentially with all necessary extra tools to provide a full-blown development environment) on different supercomputers (Jean-Zay, Adastra, CCRT), either directly if available on the machine or through containers generated with Spack and Guix, and discuss issues related to performance, portability, and reproducibility. Anyone who has dealt with HPC application installation should find useful material in this tutorial.
No specific background in Spack or Guix is necessary, and this is not about learning Spack or Guix or how to package a given library (other dedicated tutorials will be scheduled later).
The afternoon will be organized as a hands-on session where interested users will experiment with Spack/Guix-based deployment. We will provide a base application and open accounts on Grid'5000 for all attendees (where Spack and Guix:s are installed), but users can also bring their own applications and try deployment on their preferred supercomputers. We will be available (via visio and chat) to assist you and answer questions throughout the afternoon.
Note that this tutorial is part of the NUMPEX software integration strategy backed by the Exa-DI WP3 team. Our ambition is to have all NUMPEX-related libraries packaged with Guix and Spack, make Guix/Spack-based deployment part of every developer’s arsenal, and work with computing centers to make Guix/Spack-based user-level software deployment as frictionless as possible.
Resources
Recordings:
Guix and Spack for Application Deployment Across Supercomputers – Introduction, Bruno Raffin: Not available
This approach creates a guix environment with the build dependencies of the benchmarks,
like gcc or openmpi. The environment is defined in the following manifest:
$ git clone https://github.com/Maison-de-la-Simulation/bench-in-situ
$ mkdir build && cd build
$ cmake -DSESSION=MPI_SESSION -DKokkos_ENABLE_OPENMP=ON -DEuler_ENABLE_PDI=ON ..
$ make
$ ./main ../setup.ini ../io_chkpt.yml
--------------------------------------------------------------------------
WARNING: There was an error initializing an OpenFabrics device.

  Local host:   r1i3n1
  Local device: hfi1_1
--------------------------------------------------------------------------
main: error: Invalid user for SlurmUser slurm, ignored
main: fatal: Unable to process configuration file
AVBP with Guix
Table of content
This document describes how to deploy the AVBP software using Guix,
whether it is available or not on the target machine.
AVBP can be installed using the avbp Guix package.
In order to build this package, the following environment variables
need to be set:
AVBP_GIT_REPO: path to your local clone of the git repository
containing the source code of AVBP
AVBP_LIBSUP: path to the local folder containing the AVBP license
file
The following commands instantiate a containerized environment in
which a simulation is run:
  # Go to the folder containing your simulation.
  cd /path/to/simulation
  # Either export the required environment variables...
  export AVBP_GIT_REPO=... AVBP_LIBSUP=...
  # ...and run the guix command
  guix shell --container avbp coreutils openmpi@4 openssh
  # Or set the environment variables on the command line
  AVBP_GIT_REPO=... AVBP_LIBSUP=... guix shell --container avbp coreutils openmpi@4 openssh
  # Run AVBP from the folder containing the run.params file.
  cd RUN && avbp
  # Alternatively, start a parallel simulation using Open MPI
  cd RUN && mpirun -np 12 avbp
Notes:
in order to run AVBP from a containerized environment, the
coreutils, openmpi@4 and openssh packages have to be
explicitly selected (openssh being required by Open MPI).
in order to run a simulation, the root directory of the simulation
must be accessible. This won't be the case if the containerized
shell is started from the RUN subdirectory. An alternative
command allowing to directly start a simulation from within the
RUN folder could be:
At the time of writing, Guix is not natively available on the national
supercomputers.
In order to use AVBP on national supercomputers, Guix provides the
guix pack command, which allows to build an archive containing the
full software stack required to run AVBP.
This archive can be then deployed and run on the supercomputer.
So far, the techniques that have been tested are:
Relocatable binaries on Adastra and Jean-zay (see the Example
procedure on Adastra below which can be adapted to Jean-Zay)
Singularity on Jean-Zay (see the Example procedure on Jean-Zay
below)
Note: the following procedures use SLURM's srun command to start a
simulation (both in interactive or batch mode). SLURM's srun command
communicates directly with Open MPI using the library selected with
the --mpi switch (see Open MPI documentation). When using Open MPI
4.x (the current default version in Guix), this option has to be set
to --mpi=pmi2 for proper communication with SLURM.
Example procedure on Adastra (relocatable binaries)
On a machine with Guix installed
The following commands:
create an archive that contains the avbp package,
copy the archive on the supercomputer
  # On the local machine, create the archive...
  AVBP_GIT_REPO=... AVBP_LIBSUP=... guix pack -R -S /bin=bin -C zstd avbp
  [...]
  /gnu/store/xxxxxxxxxxxxxxx-avbp-tarball-pack.tar.zst
  # ...then copy it to Adastra
  scp /gnu/store/xxxxxxxxxxxxxxx-avbp-tarball-pack.tar.zst user@adastra.cines.fr:/path/to/$CCFRWORK/avbp-pack.tar.zst
On Adastra
The following commands:
unpack the archive in the $CCFRWORK directory
set the required environment variables
start a simulation
# Uncompress the archive in the $CCFRWORK space. cd $CCFRWORK && mkdir avbp-pack && zstd -d avbp-pack.tar.zst && tar xf avbp-pack.tar -C avbp-pack
# Make sure no external library is loaded from the host machine unset LD_LIBRARY_PATH
# This is needed by Slingshot when starting many MPI processes (hybrid mode gets message queue overflow). export FI_CXI_RX_MATCH_MODE=software
# This is needed to run on a full node (192 cores) due to multiple PML being selected when not set.# This PML uses libfabric for Slingshot support. export OPMI_MCA_pml=cm
# Start an interactive job from the folder containing the run.params file cd /path/to/simulation/run && srun -A user \
--time=0:20:00 \
--constraint=GENOA \
--nodes=10\
--ntasks-per-node=192\
--cpus-per-task=1\
--threads-per-core=1\
--mpi=pmi2 \
$CCFRWORK/avbp-pack/bin/avbp
An example sbatch script can be found below:
#!/bin/bash#SBATCH -A user#SBATCH --constraint=GENOA#SBATCH --time=03:00:00#SBATCH --nodes=10#SBATCH --ntasks-per-node=192#SBATCH --cpus-per-task=1#SBATCH --threads-per-core=1# Make sure no external library is loaded from the host machine. unset LD_LIBRARY_PATH
cd /path/to/simulation/run
# Enforce the use of PMI2 to communicate with Open MPI 4, default Open MPI version in Guix. srun --mpi=pmi2 $CCFRWORK/avbp-pack/bin/avbp
Caveats
Interconnection errors when starting too many MPI processes on
Adastra
Exemple usage on Jean-Zay with Singularity
On a machine with Guix installed
The following commands:
create an archive that contains the avbp, coreutils and bash
packages (the last one being a Singularity requirement),
copy the archive on the supercomputer
  # On the local machine, create the archive...
  AVBP_GIT_REPO=... AVBP_LIBSUP=... guix pack -f squashfs -S /bin=bin --entry-point=/bin/bash avbp coreutils bash
  [...]
  /gnu/store/xxxxxxxxxxxxxxx-avbp-coreutils-bash-squashfs-pack.gz.squashfs
  # ...then copy it to Jean-Zay
  scp /gnu/store/xxxxxxxxxxxxxxx-avbp-coreutils-bash-squashfs-pack.gz.squashfs user@jean-zay.idris.fr:/path/to/$WORK/avbp.sif
Note: the coreutils package is required when running AVBP in a
containerized environment.
On Jean-Zay
The Singularity image has to be copied to an authorized folder
according to Jean-Zay documentation:
  # Make the image available to Singularity
  idrcontmgr cp $WORK/avbp.sif
The following commands starts a simulation in interactive mode:
# Load the Singularity environment module load singularity
# Clean the environment variable unset LD_LIBRARY_PATH
# Run the simulation on one full node srun -A user@cpu \
--nodes=1\
--ntasks-per-node=40\
--cpus-per-task=1\
--time=01:00:00 \
--hint=nomultithread \
--mpi=pmi2 \
singularity exec \
--bind $WORK:/work \
$SINGULARITY_ALLOWED_DIR/avbp-bash.sif \
bash -c 'cd /work/path/to/simulation/run && avbp'
Singularity doesn't seem to honour the -W flag which sets the
workdir. This requires using bash -c with mulitple commands.
The $WORK space doesn't seem to be accessible from within the
container: the ~--bind $WORK:/work~ option makes it accessible
through the /work path.
Open MPI parameters need to be tweaked when running on multiple
nodes and multiple cores at the same time on Jean-Zay.
Open MPI 5.x is not working at the time of writing on Jean-Zay.
Example procedure on Irene with PCOCC
PCOCC can import Docker images generated by Guix.
On a machine with Guix installed
The following commands:
create an archive that contains the avbp, coreutils and bash
packages,
copy the archive on the supercomputer
  # On the local machine, create the archive...
  AVBP_GIT_REPO=... AVBP_LIBSUP=... guix pack -f docker bash coreutils avbp
  # ...then copy it to Irene
  scp /gnu/store/xxxxxxxxxxxxxxx-bash-coreutils-avbp-docker-pack.tar.gz \
      user@irene-fr.ccc.cea.fr:/path/to/$CCFRWORK/avbp.tar.gz
On Irene
The Docker image has to be imported using PCOCC (see TGCC documentation for more details):
It is also possible to build the avbp-tests package without actually
running the tests. This is useful if you want to run the tests
manually and have a look at the output files. This can be achieved
using the --without-tests flag:
If you want to run a subset of the standard test cases, simply copy
them to some directory on your system, set AVBP_TEST_SUITE to point
there and (re)build the avbp-tests package.
AVBP development environment
In order to instantiate a development environment for AVBP, the
AVBP_LIBSUP variable has to be set.
On a machine using Guix
The following command instantiates a containerized development
environment for AVBP:
  cd /path/to/avbp/source
  AVBP_LIBSUP=... guix shell --container --development avbp --expose=/path/to/avbp/license
Notes:
you might want to instantiate a containerized environment from the
top level directory of AVBP sources so you can actually perform the
build
you probably want to expose the path to the AVBP license inside the
container, this is done with the --expose flag
you might want to add other packages to the development
environment, for example grep, coreutils or a text editor,
simply add them to the command-line ; see the documentation.
You can also store a list of packages for a development environment in
a Manifest file, track it under version control (in your branch/fork
of the AVBP source code for example) and use it later:
The generated image has to be then copied to the remote machine and
launched using Singularity.
Below is an example on how to deploy the image on Jean-Zay:
# On the local machine: copy the image to Jean-Zay. scp /gnu/store/...-pack.gz.squashfs jean-zay.idris.fr:/path/to/$WORK/avbp-development-environment.sif
# On Jean-Zay: copy the image to the authorized directory... idrcontmgr cp $WORK/avbp-development-environment.sif
# ... load the Singularity module ... module load singularity
# ... and launch the container (in this example a full node is allocated). srun \
-A user@cpu \
--time=02:00:00 \
--exclusive \
--node=1\
--ntasks-per-node=1\
--cpus-per-task=40\
--pty \
--hint=nomultithread \
singularity shell \
--bind $WORK:/work \
$SINGULARITY_ALLOWED_DIR/avbp-development-environment.sif
Notes:
The --pty flag sets pseudo terminal mode in order to properly
handle interactive shell mode.
When not specifying --cups-per-task, only a single core is
associated to the shell task.
Gysela Development Environment with Guix
Table of content
This tutorial covers how to use Guix to get a development environment for Gysela
with Guix. The core item to the tutorial is a Guix pack, a bundle
containing all the software. The tutorial is then divided in 2 sections:
You need to have Guix available, either locally or remotely. If you're
running a Linux environment, it can be installed on your machine
according to these instructions.
  guix pack -f squashfs -S /bin=bin -S /lib=lib --entry-point=/bin/bash -m manifest-gyselalibxx-dev-env.scm -r gysela-dev-env.sif

  # Send the pack from your computer to jean-zay
  scp ./gysela-dev-env.sif jean-zay.idris.fr:gysela-dev-env.sif
Jean-Zay requires that the image is moved into the $WORK directory, and then
copied into the "authorized" directory:
  # In jean-zay
  mv -v gysela-dev-env.sif $WORK/gysela-dev-env.sif

  idrcontmgr cp $WORK/gysela-dev-env.sif
  # Now the container is copied into $SINGULARITY_ALLOWED_DIR/gysela-dev-env.sif
Using the Guix pack as a development environment
This step requires having the pack on the target machine. We have prepackaged
an image at $WORK/../commun, which you can load into the authorized directory:
Singularity only works on compute nodes, so ask SLURM to give you an interactive
session:
# Launch the container. Here we ask for 2 hours and 10 CPU cores. srun \
-A user@v100 \
--time=02:00:00 \
--ntasks=1\
--cpus-per-task=10\
--pty \
--hint=nomultithread \
-l \
singularity shell \
--bind $WORK:/work \
$SINGULARITY_ALLOWED_DIR/gysela-dev-env.sif
You can now follow the regular Gysela development workflow:
# clone gysela git clone --recurse-submodules git@gitlab.maisondelasimulation.fr:gysela-developpers/gyselalibxx.git gyselalibxx
cd gyselalibxx
# build mkdir build
cd build
cmake -DCMAKE_BUILD_TYPE=Release -DCMAKE_CXX_FLAGS="-Wall -Wno-sign-compare" ..
make -j$(nproc)# test ctest --output-on-failure
Gysela with Guix
Table of content
Requisites
You need to have Guix available, either locally or remotely. If you're
running a Linux environment, it can be installed on your machine
according to these instructions.
Where to find the Gysela packages
The Guix HPC channel contains the CPU version of the Gysela package,
while the Guix HPC non-free channel contains the CUDA version of the
Gysela package.
After activating the required channel(s), you should be able to access
the gyselalibxx package entry from the available packages using the
following command:
  $ guix show gyselalibxx
  name: gyselalibxx
  version: 0.1-1.a3be632
  outputs:
  + out: everything
  systems: x86_64-linux
  dependencies: eigen@3.4.0 fftw@3.3.10 fftwf@3.3.10 ginkgo@1.7.0
  + googletest@1.12.1 hdf5@1.10.9 kokkos@4.1.00 libyaml@0.2.5 mdspan@0.6.0
  + openblas@0.3.20 openmpi@4.1.6 paraconf@1.0.0 pdi@1.6.0
  + pdiplugin-decl-hdf5-parallel@1.6.0 pdiplugin-mpi@1.6.0
  + pdiplugin-set-value@1.6.0 pkg-config@0.29.2 python-dask@2023.7.0
  + python-h5py@3.8.0 python-matplotlib@3.8.2 python-numpy@1.23.2
  + python-pyyaml@6.0 python-scipy@1.12.0 python-sympy@1.11.1
  + python-xarray@2023.12.0 python@3.10.7
  location: guix-hpc/packages/gysela.scm:42:4
  homepage: https://gyselax.github.io/
  license: FreeBSD
  synopsis: Collection of C++ components for writing gyrokinetic semi-lagrangian codes
  description: Gyselalib++ is a collection of C++ components for writing
  + gyrokinetic semi-lagrangian codes and similar as well as a collection of such
  + codes.
Presentation of the different Gysela packages
There are different variants of the Gysela package. The default
package is called gyselalibxx and can only perform CPU calculations
without threading.
GPU support for CUDA based architectures require the Guix HPC non-free
channel to be activated. CUDA variants are optimised for a specific
GPU micro-architecture and are not backward not forward compatible.
The following architectures possess a CUDA variant of the Gysela
package: K40M, P100, V100 and A100. The corresponding packages are
gyselalibxx-cuda-k40, gyselalibxx-cuda-p100,
gyselalibxx-cuda-v100 and gyselalibxx-cuda-a100.
A word on guix shell
In this tutorial, we rely on the guix shell subcommand with the
option --pure in order to setup a controlled environment from where
to launch a simulation. This command unsets various environment
variables but this behaviour can be controlled with the --preserve
flag (this can be used when modifying LD_PRELOAD, when using CUDA
packages for example).
The basic syntax is guix shell --pure package1 package2 package3,
where package1, package2 and package3 are the (only) packages
which will be accessible from the environment. A specific version of a
package can be specified with the @ syntax. guix shell --pure
openmpi@4 will drop you in a shell with the latest packaged version
of the 4.x openmpi package.
By default, this command will drop you in a shell from where you can
manually launch your software or modify your environment. If you wan
to run a single command, you can do it like that: guix shel --pure
package1 -- my_command, where my_command is a command provided by
package1.
More information on guix shell can be found here, especially the
--container option which is also of interest when attempting to
control an execution environment.
Notes on the SLURM scheduling system
In order to use SLURM, the slurm package should be part of our
environment and thus part of the list of packages passed as arguments
to the guix shell command: guix shell --pure slurm package1 ....
When using SLURM with Guix, we should ensure that the major version of
the SLURM package we have in our environment is the same as the one
which is running on the cluster.
From the frontend, we can check the SLURM version with:
  $ squeue --version
  slurm 23.11.1
At the time of writing (2024/03/25), the default SLURM version in Guix
is 23.02.6. This can be verified with a command such as:
In our example above, the major version is 23 in both cases, so
nothing needs to be done. If the SLURM package installed on the
cluster was at, say, version 22.x, we would have to add slurm@22 to
our list of packages.
Running Gysela on a machine where Guix is available
In this chapter, we'll focus on running a simulation that is compiled
as a binary and part of the Gysela package.
The first step will be to generate a configuration file for our
simulation by providing the --dump-config flag (see section below).
Running precompiled binaries
From the terminal on the current machine
This command will generate a file named config.yaml containing the
configuration needed to run the simulation:
As stated above, the Gysela packages with CUDA support are built for a
specific micro-architecture platform. The example below uses the
variant targeted to the A100 micro-architecture,
gyselalibxx-cusa-a100.
Due to libcuda.so being tightly coupled to the kernel driver and its
location not being standard, the CUDA variants uses LD_PRELOAD to
set the path libcuda.so . One way to setup LD_PRELOAD is to use
the env command provided by the coreutils package.
Alternatively, if you don't want to include coreutils in your
execution environment, you can set LD_PRELOAD on the command line
and preserve it with the --preserve flag:
  $ LD_PRELOAD=/usr/lib64/libcuda.so guix shell --pure --preserve=^LD_PRELOAD gyselalibxx slurm -- srun -N 1  -C a100 --exclusive sheath_xperiod_vx config.yaml
  ERROR: ld.so: object '/usr/lib64/libcuda.so' from LD_PRELOAD cannot be preloaded (cannot open shared object file): ignored.
  ERROR: ld.so: object '/usr/lib64/libcuda.so' from LD_PRELOAD cannot be preloaded (cannot open shared object file): ignored.
  srun: job XXXX queued and waiting for resources
  [...]
Note the error due to the absence of libcuda.so on the frontend
machine, which can be safely ignored.
Using OAR
Building your own version of Gysela from source
Transformations of the Guix package
Using your personal source tree
Running Gysela on a machine where Guix is not available
If Guix is not available, it can still be used to generate an
execution environment that will be deployed with another tool.
Using Singularity
In these examples, we will target the Jean Zay cluster which supports
custom Singularity images and uses SLURM as scheduling system.
The method will consist in three steps:
create an image locally using Guix
load the image on the cluster
run the simulation
Gysela CPU variant
Gysela GPU variant (CUDA)
We first create locally an image compatible with Singularity:
We then copy it into the $WORK folder on the remote machine and make
it accessible for singularity:
# Upload the image to the $WORK folder on Jean Zay with a .sif extension,# this is needed for the image to be accessible.[local-machine] $ scp /gnu/store/xxxxxxxxx-bash-coreutils-gyselalibxx-cuda-v100-squashfs-pack.gz.squashfs \
user@jean-zay:/path/to/work/folder/image.sif
[...][local-machine] $ ssh user@jean-zay
# Make the image accessible to the Singularity runtime.[jean-zay] $ idrcontmgr cp /path/to/work/folder/image.sif
Finally, we run the simulation from the container, asking for one node
with one GPU:
# Activate the Singularity runtime.[jean-zay] $ module load singularity
# Create the config file from the container. It will reside in $HOME, which# is automatically bound to the container's $HOME.[jean-zay] $ srun -A user@v100 --ntasks=1 --gres=gpu:1 --cpus-per-task=1 --hint=nomultithread -l singularity exec --nv $SINGULARITY_ALLOWED_DIR/image.sif env LD_PRELOAD=/.singularity.d/libs/libcuda.so sheath_xperiod_vx --dump-config config.yaml
# Run the simulation. The results of the simulation can be found in the $HOME# folder.[jean-zay] $ srun -A user@v100 --ntasks=1 --gres=gpu:1 --cpus-per-task=1 --hint=nomultithread -l singularity exec --nv $SINGULARITY_ALLOWED_DIR/image.sif env LD_PRELOAD=/.singularity.d/libs/libcuda.so sheath_xperiod_vx config.yaml
A few notes on the command line options for singularity: according to
Jean Zay documentation, the --nv flag is required to access the GPU
hardware ; the LD_PRELOAD=/.singularity.d/libs/libcuda.so allows to
access the host bound libcuda.so by Jean-Zay administrators.
Using relocatable binaries
When using relocatable binaries, it is highly preferable to use
non-interactive (batch) mode with SLURM as various commands are needed
to setup the environment on the computation node.
Gysela GPU variant (CUDA)
We first locally create a tarball using guix pack:
# This command exports the path to the generated tarball in the store.# guix pack could be as well called directly and the path manually copied from the standard output. $ export RR_TARBALL=$(guix pack -R gyselalibxx-cuda-v100 slurm -S /bin=bin -S /etc=etc -S /lib=lib | tail -n 1)
We then copy it into the $WORK folder on the remote machine,
unpack it in a subfolder (this subfolder will contain all the Guix
filesystem hierarchy) and setup the environment:
# Upload the tarball to the $WORK folder on Jean Zay.[local-machine] $ scp $RR_TARBALL \
user@jean-zay:/path/to/work/folder/tarball.tar.gz
[...][local-machine] $ ssh user@jean-zay
# Unpack the tarball in a subfolder of the $WORK directory[jean-zay] $ mkdir $WORK/guix && tar xf $WORK/tarball.tar.gz -C $WORK/guix
# Load the environment from the subfolder.[jean-zay] $ export GUIX_PROFILE=$WORK/guix && source $GUIX_PROFILE/etc/profile
Finally, we create a batch file and use it to run the simulation,
asking for one node with one GPU:
# Create the batch file in the $WORK folder.[jean-zay] cd $WORK
[jean-zay] cat > gysela-run.sh <<EOF
#!/bin/bash
#SBATCH -A user@v100
#SBATCH --job-name=gysela-run
#SBATCH --ntasks=1
#SBATCH --cpus-per-task=1
#SBATCH --time=0:10:00
#SBATCH --gres=gpu:1
#SBATCH --hint=nomultithread
# Setup the environment on the node
export GUIX_PROFILE=$WORK/guix
source \$GUIX_PROFILE/etc/profile
export LD_PRELOAD=/usr/lib64/libcuda.so
# Ensure we are in the \$WORK folder
cd $WORK
# Generate the config file
sheath_xperiod_vx --dump-config config.yaml
# Launch the simulation
sheath_xperiod_vx config.yaml
EOF# Run the simulation. The results of the simulation can be found in# the current folder ($WORK/experiment).[jean-zay] $ sbatch gysela-run.sh
A few notes:
In this paragraph, we started our simulation using the SLURM
binaries provided by Guix. This is transparently done by prepending
the PATH variable when sourcing the $GUIX_PROFILE/etc/profile
file. It is also possible to use the SLURM binaries provided by the
cluster administrator, in which case the slurm package needs to be
removed from the arguments of guix pack.
When generating the tarball using guix pack the -S flag is used
to setup different symbolic links. While the bin symplink is not
needed (the binaries are accessed through the PATH ), the etc
and lib symlinks are needed, as they allow access to the
etc/profile and the required PDI plugins, respectively.
Spawning a development environment with Guix
As the software has a package definition in Guix, it is
straightforward to create a development environment using the -D
flag of the guix shell command.
Note that at the time of writing, the Guix package specifies a
particular commit of the git repository and does some tranformations
(specifically it removes a add_subfolder entry in the
CMakeLists.txt file in order to use the libraries provided by Guix).
Manually
We can spawn a Guix shell containing all the dependencies of Gysela in
a gyselalibxx git repo:
  # Go to the git repo
  $ cd /path/to/the/gysela/repo
  # Start the shell
  $ guix shell --pure -D gyselalibxx
You can now run cmake from this terminal.
Using direnv
The previous paragraph can be automated using direnv (make sure direnv is installed on your system):
  # Go to the git repo
  $ cd /path/to/the/gysela/repo
  # Create the .envrc file
  $ echo "use guix -D gyselalibxx" > .envrc
  # Activate direnv for this folder
  $ direnv allow .
Generate the completion file
From the development environment shell, it is possible to generate the
file compile_commands.json , needed for command completion in the
editor, by passing a specific flag to cmake:
  # Go to the git repo
  $ cd /path/to/the/gysela/repo
  # Create a build dir
  $ mkdir -p build
  # prepare the build dir and generate the compile commands
  $ cmake . -B build -DCMAKE_EXPORT_COMPILE_COMMANDS=ON -DGYSELALIBXX_DEPENDENCY_POLICIES=INSTALLED
  # Link the compile commands to the root of the repo
  $ ln -s build/compile_commands.json .
Spawning a development environment when Guix is not available
When Guix is not available on your machine, you can generate an image
using guix pack and deploy it using a tool available on the machine
like Singularity or Docker.
In order to generate such an image with Guix, we first need to
generate a manifest file.
# Generate a manifest file containing the development dependencies of# gyselalibxx-cuda-v100 and a couple of extra packages. guix shell -D gyselalibxx-cuda-v100 neovim tmux --export-manifest > manifest-gyselalibxx-dev-env.scm
Some notes on the previous command: the -D flag asks for the
development dependencies of its package argument and can be specified
multiple times. The --export-manifest flag prints the corresponding
Scheme code on stdout. The resulting environment will contain
neovim, tmux and the development dependencies of
gyselalibxx-cuda-v100 (which are the same as any CUDA variant).
With Singularity (Jean Zay)
Singularity needs a squashfs image, which can be either built using
the previously generated manifest file or downloaded from Guix HPC
build farm.
Once downloaded, make sure to rename to file so that it has a .sif
extension. See Deploying the image on Jean-Zay for information on how
to use that image.
Generating the image
Using the manifest file generated in the previous section, the
following commands build the image and copy it to Jean-Zay:
# Generate the pack file. export PACK_FILE=$(guix pack -f squashfs -S /bin=bin -S /lib=lib --entry-point=/bin/bash -m manifest-gyselalibxx-dev-env.scm | tail -n 1)# Copy the image file on Jean-Zay. scp $PACK_FILE jean-zay.idris.fr:gysela-dev-env.sif
Deploying the image on Jean-Zay
Using a shell from a Singularity image requires using the --pty
flag.
# On Jean-Zay# Move the image to $WORK mv ~/gysela-dev-env.sif $WORK
# Make the image available in Singularity idrcontmgr cp $WORK/gysela-dev-env.sif
# Activate Singularity. module load singularity
# Launch the container. Here we ask for 2 hours, one GPU and 10 CPU# cores. srun -A user@v100 --time=02:00:00 --ntasks=1 --gres=gpu:1 --cpus-per-task=10 --pty --hint=nomultithread -l singularity shell --bind $WORK:/work --nv $SINGULARITY_ALLOWED_DIR/gysela-dev-env.sif
You can now compile Gysela from within the container.
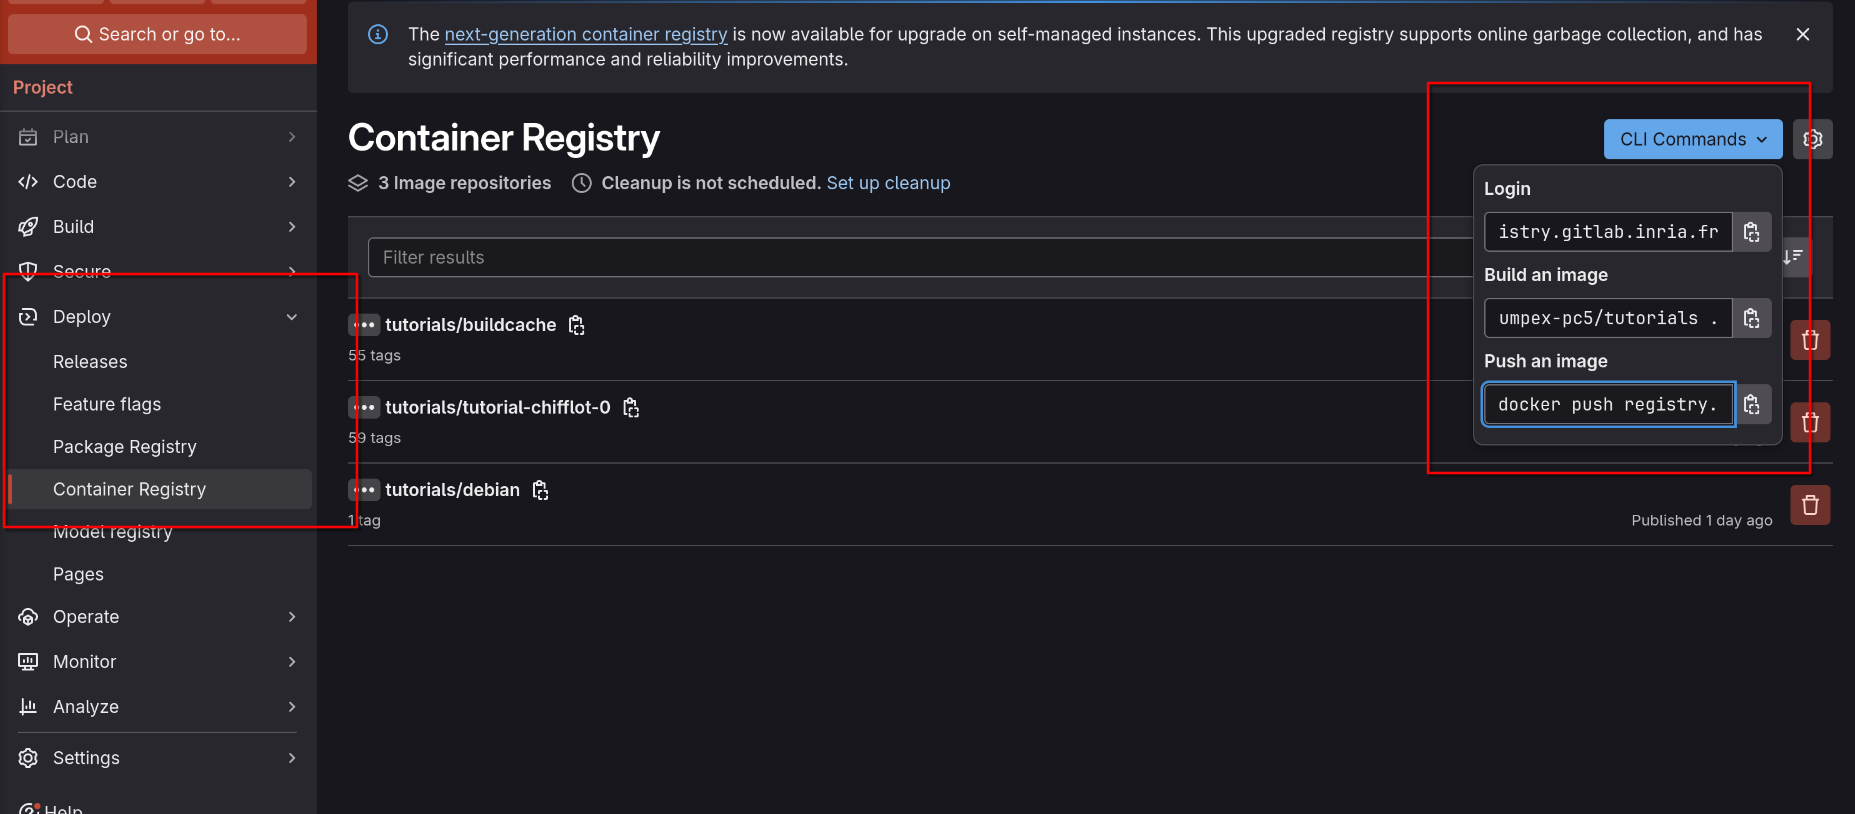
A Container Registry can be used by Docker and Singularity to store container images, that can be shared with the rest of the internet. The most popular container registry is DockerHub, from which you can pull images with docker run docker.io/debian:latest.
A GitLab installation can be configured to expose a Container Registry for a repository. This is useful to store containers to be used by the CI/CD system, or by users of your application
Container Registries and Spack
Spack can use it as a place to store the packages that it builds. The interface is exposed through spack buildcache <subcommand>. Spack is known for optimizing builds for a specific architecture. If the user configures Spack correctly, the packages built for this configuration can be shared with other users.
Finally, it is possible to transform the spack-generated containers the registry to be used with Docker or Singularity. The user must push the Spack packages with the --base-image flag, matching the system that built the image (Debian 11, Ubuntu 20.04, etc). Then, you can pull the image normally.
Gitlab
Enable the Container Registry in the repository’s configuration (Settings > General > Visibility, project features, permissions > Container registry)
Create an Access Token with at least Developer Role, with Read and Write registry permissions:
Annotate the URL’s to push and pull from the Container Registry:
Setup a Gitlab runner containing Guix
Table of content
This tutorial describes how to setup a Gitlab runner that can be used
to run Guix commands, i.e. for CI/CD or pages generation.
VM creation
We use the infrastructure provided by https://ci.inria.fr but the
instructions below can be adapted to another provider.
The first step is to create a new project: Projects → +
Create new project.
In the project creation window, fill the name of your project and
select None in the Software part in order to use gitlab-runner.
Click on Create project and then go to Dashboard, where the new
project should appear.
Click on Manage project. You should get an overview of the project,
with no virtual machines (so called slaves) so far.
Click on Manage slaves, which leads you to the list of configured VMs.
Add a new VM by clicking on + add slave.
Select Ubuntu 22.04 LTS amd64 server (ubuntu-22.04-amd64) as a
template and configure the resources you need, depending on your usage
of the VM. As a good starting point, 8GB of RAM, 4 cores and 50 GB of
disk space will allow you to use Guix comfortably.
When you're done, click on Create slave. The newly created VM should
appear in the VM list.
Keep the webpage open in your browser.
Gitlab runner configuration
In your Gitlab project, you should activate CI/CD in Settings
→ General under the Visibility submenu.
Once CI/CD is activated, you should see a new CI/CD item in the
Settings menu. Click on it.
Now, in the Runners submenu, you can create a new runner for your
project by clicking New project runner.
If you want to setup tagged jobs, add tags information, otherwise it
is safe to check the Run untagged jobs box.
Click on Create runner and you should see the Register runner page.
Keep the webpage open in your browser and follow with the instructions below.
VM configuration
Before being able to use the VM as a Gitlab runner, we have to install
both Guix and Gitlab runner related software.
Connexion to the VM
Click on the Connect button in the VM summary list on
https://ci.inria.fr website (Dashboard → Manage project
→ Manage slaves) to display the commands needed to log
into the VM using SSH.
It boils down to:
  ssh <user>@ci-ssh.inria.fr
  # From within the new shell
  ssh ci@<machine_name_or_ip>
  # It is a good time to change default root password...
  sudo passwd
  # ...and ci user password.
  passwd
Increasing the disk space on /
The default template comes with a somehow tight root filesystem as an
LVM logical volume, but with unallocated space in the corresponding
LVM volume group.
  # Display the free space in the volume group.
  sudo vgdisplay
  # Display the logical volumes (only one in the template).
  sudo lvdisplay
  # Add 10GB to the logical volume containing the root filesystem.
  sudo lvextend -L +10G /dev/ubuntu-vg/ubuntu-lv
  # Online resize the underlying filesystem.
  sudo resize2fs
Installing gitlab-runner
Here is a summary of the required commands. More details in the
documentation.
  # This prevents issues where unattended-upgrades takes a lock on the package DB.
  sudo systemctl stop unattended-upgrades.service
  # Get the Debian/Ubuntu installation script from Gitlab.
  curl -L "https://packages.gitlab.com/install/repositories/runner/gitlab-runner/script.deb.sh" | sudo bash
  # Install the Ubuntu package.
  sudo apt install gitlab-runner
  # Don't forget to restart unattended-upgrades.
  sudo systemctl start unattended-upgrades.service
Installing Guix in the VM
Here is a summary of the required commands. More details in the documentation.
## Guix installation from the script. The version packaged in Ubuntu is outdated# and is not compatible with the substitute server at Guix HPC. cd /tmp
wget https://git.savannah.gnu.org/cgit/guix.git/plain/etc/guix-install.sh
chmod +x guix-install.sh
# Answer No to "Discover substitute servers locally", Yes elsewhere. sudo ./guix-install.sh
# Configure Guix to use Guix HPC substitute server. wget https://guix.bordeaux.inria.fr/signing-key.pub
sudo guix archive --authorize < signing-key.pub
rm signing-key.pub
sudo sed -i.bak -e "s@\(ExecStart.*guix-daemon\)@\1 --substitute-urls='https://guix.bordeaux.inria.fr https://ci.guix.gnu.org https://bordeaux.guix.gnu.org'@" /etc/systemd/system/guix-daemon.service
# Restart =guix-daemon= sudo systemctl daemon-reload
sudo systemctl restart guix-daemon.service
# Log in as user gitlab-runner, which is used by the CI sudo -u gitlab-runner -s
# Add Guix HPC configuration mkdir -p $HOME/.config/guix
cat > $HOME/.config/guix <<EOF
(append
(list
(channel
(name 'guix-hpc-non-free)
(url "https://gitlab.inria.fr/guix-hpc/guix-hpc-non-free.git")
(branch "master")
(commit "23d5f240e10f6431e8b6feb57bf20b4def78baa2")))
%default-channels)
EOF# Update the channels. guix pull
Configuring gitlab-runner
Go back to the Register runner webpage and follow the instructions
there.
It boils down to executing the following command (use sudo to execute it as root):
and selecting the right instance (https://gitlab.inria.fr in our case)
and the right executor (shell in our case, see the documentation for
more details).
Once in the Runners submenu of Settings → CI/CD, you
should see a new runner up and running.
Using the runner
Here is a sample .gitlab-ci.yaml file running a helloworld stage:
When pushed to your repo, this file should spawn a successful CI job
and you should be able to see the result of a helloworld command in
the corresponding log.
HPC Environment
This is the landing page for the “HPC Environment” sub-section of the site.
This tutorial will focus on using
Grid5000 for both
building the container with Guix and deploying it with Singularity,
as it provides both tools.
The container may be built on any computer with Guix installed. You
may refer to the
documentation
if you wish to install Guix on your machine. Beware that if you
build it on your local machine, you’ll have to copy it to Grid5000.
Additional instructions will be provided for deployment on Jean-Zay,
that can be easily adapted to any cluster supporting Singularity and
using SLURM as job management system.
The application chosen as an example is
Chameleon, a
dense linear algebra software for heterogeneous architectures that
supports MPI and NVIDIA GPUs through CUDA or AMD GPUs through ROCm.
Chameleon on NVIDIA GPUs
Build the container on Grid5000
Login to Grid500 (detailed instructions
here).
The full list of
resources
shows where to find an NVIDIA GPU and an x86_64 CPU (for
Singularity). For instance, the chifflot queue, located in Lille,
contains nodes with NVIDIA P100 GPUs.
ssh lille.g5k
mkdir tuto && cd tuto
Get the channels file. The chameleon-cuda
package (the chameleon package variant with CUDA support) is
defined in the Guix-HPC
non-free
channel, which is not activated by default.
Generate the Singularity container image with the guix pack
command, prefixed with guix time-machine in order to use our
channels.scm file. The -r option creates a symbolic link to the
resulting container image in the Guix store, as chameleon.sif.
CUDA applications deployed with Guix need LD_PRELOAD to
be set with the path to libcuda.so since the library is
provided by the proprietary CUDA driver, installed on the
machine, and not part of the Guix software stack.
Tip
The OPENBLAS_NUM_THREADS environment variable is set to
improve the computation performance and not compulsory.
Deploy the container on Jean-Zay
Copy the image to Jean-Zay. Depending on your SSH setup, you
might have to adapt the commands below.
# Disconnect from Grid5000.exit
# Copy the image from Grid5000 to Jean-Zayscp lille.g5k:tuto/chameleon.sif jean-zay:chameleon.sif
Setup the container image on Jean-Zay. First, the image has to
be copied to the allowed space ($SINGULARITY_ALLOWED_DIR) in
order to be accessible to Singularity. This step is specific to
Jean-Zay, more details in the
documentation.
Then the singularity module needs to be loaded (this step is not
always necessary, depending on the supercomputer, but is not
specific to Jean-Zay).
Environment variables are propagated to the Singularity container
context, but since the path to libcuda.so doesn’t exist outside of the
container context (the path in bind-mounted by Singularity due to the --nv
flag) it leads to an error when LD_PRELOAD is declared outside of the
container context.
Deploy the container on Vega (EuroHPC)
Copy the image to Vega. Depending on your SSH setup, you
might have to adapt the commands below.
# Copy the image from Grid5000 to Vegascp lille.g5k:tuto/chameleon.sif vega:chameleon.sif
# Copy the image from Grid5000 to Jean-Zayscp lille.g5k:tuto/chameleon.sif meluxina:chameleon.sif
Start an interactive allocation with SLURM and load
Singularity/Apptainer. On MeluXina, the singularity command is
available through a module and the module command is only
accessible on a compute node.
On Irene, resources are allocated using ccc_mprun. See the documentation.
For instance, the -s option spawns an interactive session directly on a compute node.
Tip
On Irene, the number of allocated GPUs is directly related to the number of allocated cores
on the node. Here, 20 cores are allocated on a V100 which contains 40 cores in total, so 50%
of the GPUs available on the node (4 x V100) are allocated. See the documentation.
Tip
The --module nvidia option make the CUDA libraries available inside the
image in the /pcocc/nvidia/usr/lib64 folder.
Chameleon on AMD GPUs
Build the image on Grid5000
Connect to Grid5000 and build the Singularity container.
ssh lille@g5k
cd tuto
guix time-machine -C channels.scm -- pack -f squashfs chameleon-hip bash -r ./chameleon-hip.sif
Deploy on Adastra
Copy the Singularity image to Adastra. Depending on your SSH setup, you
might have to adapt the commands below.
# Disconnect from Grid5000.exit
# Copy the image from Grid5000 to Adastrascp lille.g5k:tuto/chameleon-hip.sif adastra:chameleon-hip.sif
Warning
Before being able to use a custom Singularity image, it has be
manually copied to an authorized path by the support, which should
be contacted by email. See the
documentation.
For machines where Singularity is not available (or you have to ask
support to deploy your custom image), an alternative can be the
relocatable binary archive. The command below generates an archive
containing chameleon-hip for AMD GPUs that can be run on e.g.
Adastra:
This archive can then be uploaded to a supercomputer (e.g. Adastra)
and deployed:
# Copy the archive to Adastrascp chameleon-hip.tar.zst adastra:
# SSH into Adastrassh adastra
# Extract the archive into its own folder[adastra] mkdir chameleon-hip && zstd -d chameleon-hip.tar.zst \
&& tar xf chameleon-hip.tar -C chameleon-hip
# Start the job[adastra] OPENBLAS_NUM_THREADS=1\
srun --cpu-bind=socket \
-A cad15174 \
--time=0:10:00 \
--constraint=MI250 \
--exclusive \
--nodes=4\
--mpi=pmi2 \
$CCFRWORK/chameleon-hip-common/bin/chameleon_stesting \
-o gemm -n 96000 -b 2000 --nowarmup -g 8
Modern HPC Workflow Example (Spack)
Table of content
This is the second part of the Worklow Tutorial. In the previous example we
show how to use Singularity and Guix for our running example, Chameleon, on HPC
clusters (Modern HPC Workflow Example (Guix)).
Warning
This tutorial relies on a GitLab access token for the registry. Since the tutorial
took place, this token has expired.
In this second part, we will use Spack instead of Guix. We will also produce
Spack-generated containers, for easy reproducibility of the workflow across
different computers.
In summary, we are going to:
Install Spack on Grid'5000.
Build Chameleon with CUDA support.
Push the packages into a container registry.
Pull the packages as a Singularity container.
Run the container in the GPU partition of Grid'5000, or other supercomputer.
About Container Registries
There are 2 ways to generate containers with Spack:
The containerize option has a number of drawbacks, so we want to push with the
Build Caches option. This also has the benefit of being able to build and cache
packages on CI/CD, allowing for quicker deployments.
The Spack build cache will require setting up a container registry, in some Git
Forge solution. Both GitHub and GitLab provide their own Container Registry
solutions. This guide presents how to create it: Setup a Container Registry on GitLab.
For this tutorial, we will use the container registry hosted at Inria’s GitLab.
Build the Container on Grid'5000
We will connect to the Lillie site on Grid'5000, exactly the same as with the
Guix guide.
Note
If you are having trouble at any step, you can skip this and download the
container directly:
We will create an Spack environment, that holds our configuration and installed
packages. The Spack environment will create a spack.yaml file, which we will
edit:
$ spack env create --dir ./myenv   # this may be a bit slow
$ spack env activate ./myenv
$ spack env status
==> In environment /home/fayatsllamas/myenv
Open the ./myenv/spack.yaml with your favorite editor, and you will see something
like this:
Configure Spack to build our packages for generic x86_64. This will ensure it
doesn’t mix the ISA’s of the nodes we will use.
Configure 2 mirrors:
inria-pull is a mirror I populated with caches of the packages for the
tutorial.
inria-<name> is a mirror you will use to push the packages you build, as
an example.
Important
Change inria-<name> and the URL .../buildcache-<name> to a unique name.
You will push to this cache as an example, so we don’t collide between
each other. You can use your G5k login, for example.
Edit the spack.yaml file and save it. After the environment has been modified,
we call spack concretize to “lock” our changes (to a spack.lock file). We
can use spack spec to preview the status of our environment. It will show the
packages we are missing to be built.
Note
spack concretize locks the characteristics of the environment to the current
machine. We are concretizing on the frontend node for convenience, and to be
able to test our packages in it.
After the packages have been built, let’s push them into the container
registry.
Important
To push our packages to be used as containers, we must add the
--base-image flag. As Spack doesn’t built everything from the bottom, we must
provide a base image, from which the libc library will be taken. You must
match your --base-image to the system that built the packages. We have built
the packages under Grid'5000 Debian 11 installation, so the base image should be
a Debian 11 too. Not matching this, or not passing --base-image will render
the push unusable.
Because Docker might put a rate-limit on the pulls of an image, and we are
sharing the same IP address (10 downloads per hour per IP), I mirrored the
Debian 11 image to the Inria registry. Please use this image instead (otherwise,
the command would be --base-image debian:11):
Because Singularity might use heavy CPU/Memory resources, we build the container
Image while we are in the compute node. The output is a SIF file (Singularity
Image Format).
Software deployment in HPC systems is a complex problem, due to specific
constrains, such as:
No access to root
No package install, update or modification as a user
Some kernel features are disabled, like user namespaces
As users develop more complex software, their needs for extra dependencies
increase. The classical solution to providing extra software to the user
involves modules. Modules can be loaded from the terminal of a user, and are
managed by the HPC admin team.
How to deploy different versions of the package, or different variants?
How to reproduce the software stack at a later point in time (even for
archival purposes)
How to move from one machine to another, given that the exposed modules are
machine dependant?
How to modify a package in the dependency chain?
Shift in the paradigm of software deployment
In order to solve the above mentioned issues and in the view of a future of
Exascale computing, we propose a shift in the paradigm of software deployment,
from the classical way, where the admin team provides the software stack for
the users, to a new procedure where the user brings their own software stack.
This method has a number of advantages, among the following:
The user is in full control of their software stack.
A container is portable across different compute centers.
The cost of moving to a new HPC system is reduced.
Singularity/Apptainer
Singularity is an application
that can run containers in an HPC environment. It is highly optimized for the
task, and has interoperability with Slurm, MPI or GPU specific drivers.
Usually, we find a duplicity of software stacks, and platforms to deploy to:
Containers (Singularity or Docker) solve this by having a single interface that
merges everything. From the software stack, the container is the platform to
deploy to. From the platform point of view, software comes bundled as a
container:
Singularity uses its own container format (sif), which can also be
transparently generated from a Docker container.
Singularity is available in the majority of Tier-1 and Tier-0 HPC centers,
either in the default environment or loaded from a module:
# On LUMI (European Tier-0 cluster)
$ singularity --version
singularity-ce version 4.1.3-150500.10.7
#
# On Jean-Zay (French Tier-1 cluster)
$ module load singularity
$ singularity --version
singularity version 3.8.5
Singularity can download and run a container image directly from an online
container registry such as DockerHub using the
docker:// reference:
Using containers through Singularity can provide a solution to some of the
points mentioned in the previous section, but also transfers to the user the
task to build a container with the specific software stack they need.
Building a container can be streamlined using package managers.
In our approach, we selected two package managers to build the containers:
Guix and Spack.
Differences between Guix and Spack
GNU Guix is a package manager for GNU/Linux systems. It is designed to give
users more control over their general-purpose and specialized computing
environments, and make these easier to reproduce over time and deploy to one or
many devices. (source: Guix official website)
Spack is a package manager for supercomputers, Linux, and macOS. It makes
installing scientific software easy. Spack isn’t tied to a particular language;
you can build a software stack in Python or R, link to libraries written in C,
C++, or Fortran, and easily swap compilers or target specific
microarchitectures. (source: Spack official website)
A key feature of the Spack package manager is that it allows users to
integrate parts of the system they are building on: Spack packages can
use compilers or link against libraries provided by the host system.
Use of system-provided software is even a requirement at the lowest
level of the stack.
Guix differs from Spack in two fundamental ways: self containment, and
support for reproducibility and provenance tracking. Self containment
stems from the fact that Guix packages never rely on software
pre-installed on the system; its packages express all their
dependencies, thereby ensuring control over the software stack, wherever
Guix deploys it. This is in stark contrast with Spack, where packages
may depend on software pre-installed on the system.
Unlike Spack, Guix builds packages in isolated environments
(containers), which guarantees independence from the host system and
allows for reproducible
builds. As a result,
reproducible deployment with Guix means that the same software stack can
be deployed on different machines and at different points in time—there
are no surprises. Conversely, deployment with Spack depends on the
state of the host system.
TODO: Comparative table of features
Building containers with Guix
Guix is a package manager for Linux focused on the reproducibility of its
artifacts. Given a fixed set of package definitions (a list of channels at a specific commit in Guix terminology), Guix will produce the same
binaries bit-by-bit, even after years between experiments.
The Guix project itself maintains a list of package definitions installed
together with the package manager tool.
For some specific scientific packages, it might be necessary to include extra package definitions from third-party channels: a list of science-related channels can be found here.
Note that these channels contain only FOSS-licensed packages. In order to access
to package definitions of proprietary software or of software that depend on
non-free software, the following channels could be included:
The Guix package manager is able by itself to instantiate a containerized environment with a set of packages using the guix shell --container command.
Unfortunately, Guix is not yet available on Tier-1 and Tier-0 supercomputers, but it can be used to generate a Singularity image locally before deploying it on a supercomputer. This gives the user both the reproducibility properties of the Guix package manager and the portability of Singularity containers.
To get started, install Guix
or connect to a machine with a Guix installation (Grid5000 for example).
Guix generates Singularity images with the guix pack -f squashfs command, followed by a list of packages. For example, the following command would generate a Singularity image containing the bash and gcc-toolchain packages:
The image can be configured with an entry point, allowing to directly start an arbitrary program when called with the run subcommand of Singularity. This is done using the --entry-point flag:
# Create an image containing bash and hello, an "hello world" program,
# that will be started by default.
$ guix pack -f squashfs --entry-point=/bin/hello bash hello
[...]
/gnu/store/xxxxxxxxxxxxxxxxxxxxxxxxx-bash-hello-squashfs-pack.gz.squashfs
In order to easily find the generated image, the -r flag creates a link to the
image (along with other actions):
# Create an image containing bash and hello, an "hello world" program,
# that will be started by default.
$ guix pack -f squashfs --entry-point=/bin/hello bash hello -r hello.sif
[...]
/gnu/store/xxxxxxxxxxxxxxxxxxxxxxxxx-bash-hello-squashfs-pack.gz.squashfs
$ ls -l
[...] hello.sif -> /gnu/store/xxxxxxxxxxxxxxxxxxxxxxxxx-bash-hello-squashfs-pack.gz.squashfs
The image can be then transfered to the target supercomputer and run using
Singularity. Below is an example on LUMI:
Instead of specifying the list of packages on the command line, the packages can
be specified through a manifest file. This file can be written by hand or
generated using the command guix shell --export-manifest. Manifests are useful
when dealing with a long list of packages or package transformations. Since they
contain code, they can be used to perform a broad variety of modifications on
the package set such as defining package variants or new packages that are
needed in a specific context. The example below generates a simple
manifest.scm file containing the bash and hello packages:
The command guix describe -f channels generates a channels file that is used
to keep track of the current state of package definitions:
$ guix describe -f channels > channels.scm
Both files channels.scm and manifest.scm should be kept under version
control and are sufficient to generate an image containing the exact same
software stack down to the lib C, with the exact same version and compile
options, in any machine where the guix command is available, using the command
guix time-machine:
Note that in order to generate the exact same file (bit-for-bit identical), the
same image specific options such as --entry-point have to be specified.
Building container images with Spack
Spack is a package manager specifically targeted at HPC systems. One of its
selling points is that it can easily target specific features of the
supercomputer, like compiler, CPU architecture, configuration, etc.
Unlike Guix, Spack can be installed directly on a supercomputer by the user, as
it only requires git clone in the home directory. There are some problems with
this:
Reproducibility and portability of the environment across machines or time
Instead of using Spack directly on the supercomputer, it is possible to use
Spack to generate Singularity or Docker containers. Once the container is
generated, the same environment will be able to deployed to any machine.
To generate the container, Spack documents 2 ways:
In order to generate a binary optimized for a specific CPU micro-architecture,
the --tune flag can be passed to a variety of Guix commands:
# Build a PETSc package optimized for Intel x86_64 Cascade Lake micro-architecture.
$ guix build --tune=cascadelake petsc
# Instantiate a containerized environment containing an optimized PETSc package.
$ guix shell --container --tune=cascadelake petsc
# Generate a manifest file where all the tunable packages are optimized.
$ guix shell --export-manifest --tune=cascadelake pkg1 pkg2 ... pkgN
For Spack, this can be done by adding the target specification on the command-line:
$ spack install petsc target=cascadelake
Spack also is capable of easily configuring the CFLAGS for a package:
$ spack install petsc cppflags=-O3
MPI performance
The 3 aspects of concern when getting the best performance with MPI and
Containers are:
Container runtime performance: the slowdown caused by the container runtime
having to translate between namespaces is not significant enough.
Network drivers: as long as the containers are properly built, the drivers
should discover the high-speed network stack properly.
MPI distribution: the admin team might use custom compilation flags for their
MPI distribution. It remains to be seen what’s the impact of this.
After many tests, we have concluded that Singularity doesn’t seem to pose an
issue against performance. Although the benchmark figures don’t indicate any
significant performance loss, the user is expected to compare the performance
with their own software to run.
If the MPI drivers aren’t properly detected, the performance figures for
benchmarks will be orders of magnitude different, as this usually means falling
back to the TCP network stack instead of using the high-performance network. The
network driver for MPI is controlled with MCA parameters --mca key value.
Usually MPI detects the driver automatically, but you can force some driver with
--mca pml <name>, or to debug if MPI is selecting the proper driver. This is
further explained in Notes on MPI.
Regarding the actual MPI installation, a generic OpenMPI installation
usually can get performance figures in the same order of magnitudes as the MPI
installation provided by the admin team, provided the network driver is properly
selected. If the user has the technical expertise, the MPI installation can be
passed-through the container and replaced at runtime. More investigation
around the viability of this method is to be done.
CUDA and ROCM stacks
Singularity allows passing through the graphics cards to the containers, with
the --nv and --rocm flags.
Spack packages that may support CUDA, have the +cuda specification that can
be enabled. Additionally, other packages support specifying the cuda
architecture with cuda_arch=<arch>. ROCM support is also provided in
selected packages through the +rocm spec.
Guix provides CUDA packages through the Guix-HPC Non-free
repository. This contains package variants with CUDA support. ROCM software stack and
package variants are hosted in the regular Guix-HPC channel.
Application vs development containers
When building a container or a software environment, we usually make the
distinction between “application” and “development” containers:
If we have every dependency to build some package, except the package itself,
it’s a development container.
If it only contains the application itself, it’s an app container.
Because of this, there are 2 separate usecases for a container:
Getting all the dependencies to iterate when developing a package.
Deploying a final package into a supercomputer.
Alternatives
This workflow provides some flexibility on how to use the tools proposed.
Other alternative ways are:
Using Spack natively:
Useful for iterating a solution on a local machine.
Installing Spack doesn’t require admin, so it can be tested on a
supercomputer as well.
Can run into the limit of inodes if used in a supercomputer.
Using Guix natively:
Also useful for local testing.
Guix is not available is supercomputers.
Using Singularity containers not built with Guix or Spack:
Doesn’t have the guarantees of reproducibility or customizability, but still
a good step towards isolation and portability.
Guix relocatable binaries:
This is an alternative format of guix pack, which produces a single file
that can be run without Singularity.
Very good option for application deployment, but can be tricky to be setup
as development solutions.
HPC centers support for Singularity
The following list describes the platform support for the supercomputers we have
tested the workflow on, and any caveats encountered.
Supercomputer
High-speed Network
CPU
GPU
Singularity support?
Jean-Zay
InfiniBand
Intel x86-64
Nvidia (CUDA)
✅*
Adastra
Cray
AMD x86-64
AMD
✅*
Irene
InfiniBand
Intel x86-64
Nvidia P100 (CUDA)
❌*
LUMI
Cray
AMD x86-64
AMD MI250X (ROCM)
✅
Vega
InfiniBand
Intel x86-64
Nvidia A100 (CUDA)
✅
Meluxina
InfiniBand
AMD x86-64
Nvidia A100 (CUDA)
✅
Jean-Zay
Containers must be placed in the “allowed directory” with idrcontmgr:
Singularity is not supported. Instead, a Docker-compatible runtime pcocc-rs
is provided.
Guix images must be genrated with -f docker instead.
Adastra
The admin team has to verify each container image before use.
If quick deployment is required, itis also possible to use Guix relocatable binaries or a native spack
installation. Guix can generate relocatable binaries with:
# Generate the pack, linking /bin
$ guix pack --relocatable -S /bin=bin <package>
...
/gnu/store/...-tarball-pack.tar.gz

# Move the pack to the Adastra and unpack it
$ scp /gnu/store/...-tarball-pack.tar.gz adastra:~/reloc.tar.gz
$ ssh adastra
[adastra] $ tar -xvf reloc.tar.gz

[adastra] $ ./bin/something
There are 2 ways to debug which MCA parameters are used:
ompi_info --all will display all the MCA parameters that are avaiable a priori.
The mpi_show_mca_params MCA parameters can be set to all, default,
file, api or enviro to display their selected value. Sometimes thy will
just show as key= (default), which is not useful.
Network drivers
There are 3 modes for MPI to select networks 1: ob1, cm and ucx, that can be
set with --mca pml <ob1,cm,ucx> (PML: Point-to-point Message Layer).
ucx manages the devices on its own. It should be used for InfiniBand
networks. UCX can be further configured with ucx-specific env variables, for
example mpirun --mca pml ucx -X UCX_LOG_LEVEL=debug ....
ob1 is the multi-device, multi-rail engine and is the “default” choice. It is
configured with --mca pml ob1. It used different backends for the
Byte-Transport-Layer (btl), which can be configured with --mca btl <name>,
such as:
tcp
self
sm shared memory
ofi Libfabric, alternate way
uct UCX, alternate way
cm can interface with “matching” network cards that are MPI-enabled. It uses
MTL’s (not BTL’s) which can be set with --mca mtl <name>
psm2 Single-threaded Omni-Path
ofi Libfabric
In short: ucx provides the performance for InfiniBand, cm can be used for
specific setups, and ob1 as the fallback for low-performance TCP or
local-device. libfabric can be used through cm or ob1.
The purpose of this tuto is to let you experiment the Grid'5000 platform, which is a large-scale and flexible testbed for experiment-driven research in all areas of computer science, with a focus on parallel and distributed computing including Cloud, HPC and Big Data and AI.
As an example we will try to run an implementation of Conway’s Game of Life using Message Passing Interface (MPI) for parallelization.
Set up a Grid'5000 account
To request an account on Grid’5000 fill that form and select the appropriate Group Granting Access, Team and Project. Members of the NumPEx-PC5 Team should use the values documented here.
Then make sure to generate a SSH keypair on your PC and to upload the public key on Grid'5000 ; this will allow direct connection using ssh from your PC. Detailled explanations are given here.
Read the documentation
A very extensive documentation is available on Grid'5000 User Portal. For that tutorial you may start with these two articles:
If you are not familiar with MPI you might also have a look here.
Prepare the work
Connect to one Grid'5000 site
If you applied the correct SSH configuration on your PC (see here), you should be able to connect directly to a given Grid'5000 front-end, let’s say for instance Grenoble, with a simple ssh command :
jcharousset@DEDIPPCY117:~$ ssh grenoble.g5k
Linux fgrenoble 5.10.0-30-amd64 #1 SMP Debian 5.10.218-1 (2024-06-01) x86_64
----- Grid'5000 - Grenoble - fgrenoble.grenoble.grid5000.fr -----

** This site has 5 clusters (more details at https://www.grid5000.fr/w/Grenoble:Hardware)
 * Available in queue default with exotic job type:
 - drac   (2016): 12 nodes (2 CPUs POWER8NVL 1.0, 10 cores/CPU, 4 GPUs Tesla P100-SXM2-16GB, 128GB RAM, 2x931GB HDD, 1 x 10Gb Ethernet, 2 x 100Gb InfiniBand)
 - yeti   (2017): 4 nodes (4 CPUs Intel Xeon Gold 6130, 16 cores/CPU, 768GB RAM, 447GB SSD, 2x1490GB SSD, 3x1863GB HDD, 1 x 10Gb Ethernet, 1 x 100Gb Omni-Path)
 - troll  (2019): 4 nodes (2 CPUs Intel Xeon Gold 5218, 16 cores/CPU, 384GB RAM, 1536GB PMEM, 447GB SSD, 1490GB SSD, 1 x 25Gb Ethernet, 1 x 100Gb Omni-Path)
 - servan (2021): 2 nodes (2 CPUs AMD EPYC 7352, 24 cores/CPU, 128GB RAM, 2x1490GB SSD, 1 x 25Gb Ethernet, 2 x 100Gb FPGA/Ethernet)
 * Available in queue default:
 - dahu   (2017): 32 nodes (2 CPUs Intel Xeon Gold 6130, 16 cores/CPU, 192GB RAM, 223GB SSD, 447GB SSD, 3726GB HDD, 1 x 10Gb Ethernet, 1 x 100Gb Omni-Path)

** Useful links:
 - users home: https://www.grid5000.fr/w/Users_Home
 - usage policy: https://www.grid5000.fr/w/Grid5000:UsagePolicy
 - account management (password change): https://api.grid5000.fr/ui/account
 - support: https://www.grid5000.fr/w/Support

** Other sites: lille luxembourg lyon nancy nantes rennes sophia strasbourg toulouse

Last login: Fri Jun 14 11:40:27 2024 from 192.168.66.33
jcharous@fgrenoble:~$
Build the example application
Let’s first retrieve the original source code by cloning the Github repository:
There is a distinct home directory on each Grid'5000 site, so what has been stored in Grenoble will not be available if you connect to Lyon or Nancy.
To generate a more verbose output, you might want to uncomment lines 257 to 264 of the file Game-of-Life/mpi/game.c - thus a subset of the matrix will be printed at each generation.
		/*Uncomment following lines if you want to see the generations of process with
		rank "my_rank" evolving*/


		// if(my_rank==0)
		// {
			// printf("Generation:%d\n",gen+1);
			// for(i=0;i<local_M;++i)
				// putchar('~');
			// putchar('\n');
			// print_local_matrix();
		// }
Resulting executable is available at ~/Game-Of-Life/mpi/gameoflife
Run the computation
Request nodes for a computation
Now we will ask the Grid'5000 platform to give us access to one node (comprising multiple CPU cores, 32 in our case) for an interactive session. We use also the walltime option to set an upper limit of 1 hour to our session ; after that time the session will be automatically killed.
Let’s wait until the scheduler decides to serve our request… be patient.
Eventually our request will be picked up from the queue and the scheduler will grant us access to one computation node (dahu-28 in our example):
mpirun is the command to launch a MPI application on multiple cpus and cores,
--mca pml ^ucx is the set of options to tell Open MPI not to try to use high performance interconnect hardware and avoid a HUGE amount of warnings beeing shown,
$OAR_NODEFILE is the list of cpu cores to be used for the computation - this file was generated by the oarsub command in the previous section,
-n 3200 -m 3200 -max 100 are the parameters for our application, asking for a grid size of 3200*3200 and 100 generations.
You should see printouts of the matrix at each generation, followed by an information about the total time spent.
Congratulations, you did it :smiley:
What’s next ?
This very simple exercise should give you the basic idea. There are still lot of additionals topics you should explore:
Fine tune Open MPI config for performance optimisation,
Use OAR batch jobs instead of interactive sessions,
Use OAR options to precisely specify the ressources you want, requesting for a specific hardware property (e.g. 2 nodes with an SSD and 256G or more RAM) and/or a specific topology (e.g. 16 cores distributed on 4 different CPUs from the same node)
Automate complete workflows including transport of data, executables and/or source code to and from Grid'5000, before and after a computation,
Caution
Grid'5000 does NOT have any BACKUP service for users’ home directories, it is your responsibility to save what needs to be saved in some place outside Grid'5000.
Run computations on multiple nodes,
Tip
For this you will need to properly configure the High Performance Interconnect hardware available on the specific nodes that were assigned for your computation, either Infiniband or Omni-Path. See specific subsection in Run MPI On Grid'5000.
Customize the software environment, add new packages, deploy specific images,
Make use of GPU acceleration,
Learn tools for debugging, benchmarking and monitoring
…
Guix for HPC
Table of content
This short tutorial summarizes the steps to install Guix on a Linux
distribution using systemd as an init system and the additional
steps that make it suitable to use in a HPC context.
You can safely answer yes to all the questions asked by the script.
Tip
If you wish to do the installation manually, the steps are provided in
the documentation.
Configure additional Guix channels
Per-user channel configuration in Guix is defined in the file
channels.scm, located in $HOME/.config/guix.
The Guix-Science channel contains scientific software that is too
specific to be included in Guix.
The Guix-HPC channel contains more HPC-centered software and the ROCm
stack definition.
Both these channels have a non-free counterpart containing package
definition of proprietary software (e.g. CUDA toolkit) and free
software which depends on proprietary software (e.g. packages with
CUDA support).
Since the Guix-HPC non-free channel depends on all the above mentioned
channels, it can be a good starting point, provided that you don't
mind having access to non-free software.
In this case, the following channels.scm file could be used:
The content of the channels.scm file is Scheme code (it is actually
a list of channel objects). The %default-channels variable is a
list containing the Guix channel and should be used as a base to
generate a list of channels.
If you'd like to have both the Guix-HPC and Guix-Science channels
without any proprietary software definition, you could use the
following channels.scm file:
This will take some time as this command updates the available
channels and builds up the package definitions.
Add the Guix HPC substitute server
In order to avoid building the packages defined in the Guix HPC
channels, it is possible to configure the guix-daemon to connect to
Guix HPC substitute server which serves precompiled binaries of the
software packaged in the Guix HPC channels and is located at
https://guix.bordeaux.inria.fr.
This requires two steps: modifying the guix-daemon configuration and
adding the new substitute server key to Guix.
Configure the guix-daemon
If you are using Guix System, please refer to the official
documentation is available here.
The following instructions apply when Guix is installed on a foreign
distribution using systemd.
In order to add a new substitute server, the guix-daemon must be
specified the full list of substitute servers, through the
--substitute-urls switch. In our case the full list is
'https://guix.bordeaux.inria.fr https://ci.guix.gnu.org
https://bordeaux.guix.gnu.org'
.
The guix-daemon.service file (generally located in
/etc/systemd/system or in /lib/systemd/system/) should be manually
edited to add the above-mentioned flag:
The guix-daemon service then needs to be restarted:
  # Reload the configuration.
  sudo systemctl daemon-reload
  # Restart the deamon.
  sudo systemctl restart guix-daemon.service
Authenticate the new substitute server
In order to accept substitutes from the Guix HPC substitute server,
its key must be authorized:
  # Download the server key.
  wget https://guix.bordeaux.inria.fr/signing-key.pub
  # Add the key to Guix configuration.
  sudo guix archive --authorize < signing-key.pub
  # Optionally remove the key file.
  rm signing-key.pub
Check that everything is working properly
Run for instance the following command, which instantiates a dynamic
environment containing the hello-mpi package defined in the Guix-HPC
channel and runs it:
guix shell hello-mpi -- hello-mpi
Package Managers
This is the landing page for the “Package Managers” sub-section of the site.
--base-image <BASE IMAGE> should point to a docker image that macthes your
host system. For example, I build my packages from Ubuntu 24.04, so I pass
--base-image ubuntu:24.04.
After everything is pushed, Spack will notify you about the OCI urls:
$ spack buildcache push --base-image ubuntu:24.04 --force inria
==> Selected 39 specs to push to oci://registry.gitlab.inria.fr/numpex-pc5/wp3/spack-repo/buildcache-x86_64_v4
...
==> [39/39] Tagged osu-micro-benchmarks@7.4/c6t2x6x as registry.gitlab.inria.fr/numpex-pc5/wp3/spack-repo/buildcache-x86_64_v4:osu-micro-benchmarks-7.4-c6t2x6xfynvaop3ed66rtq3rvb5jaap5.spack
You can use the URI in docker run <uri> or singularity run docker://<uri>